Boogschutter
50 Types of Lighting in Photography: Ultimate Guide

The types of lighting used in photography give you the ability to create the images you envision.
A discussion of the types of photography lighting starts with an understanding of natural and artificial light, soft vs hard light, warm vs cool light. And it is important to be familiar with common artificial lighting equipment including continuous lighting, strobe lighting and portrait options for both.
From there, it is essential to understand lighting placement, purposes and techniques and their impact on your photography. Becoming familiar with functions such as key light, fill light, hair light, back light, background light and more will give you tools to use to produce images with higher quality and visual appeal.
This guide to the types of lighting in photography will acquaint you and deepen your understanding of this essential issue that lies at the heart of great photography.
Why Lighting is Important in Photography
Lighting is important in photography because it impacts all aspects of it and shapes the story the image tells. Perhaps this is why the art form is called “photography,” which means “drawing with light.”
In terms of visual appeal, lighting influences the atmosphere and mood of the image. Natural light has a different impact on photography than artificial light, for example.
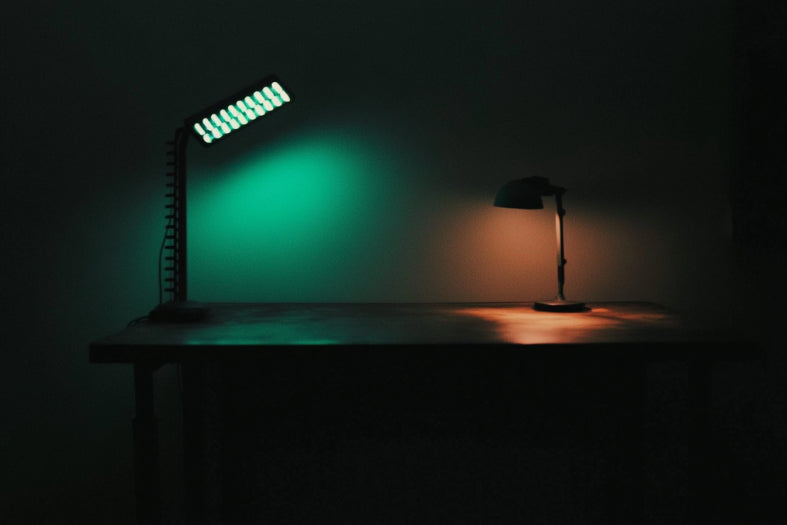
And images taken in a studio will look very different depending on the placement of the light such as front lighting, back lighting, side lighting, etc. Using various lighting techniques like Rembrandt lighting or loop lighting, broad or short lighting, split lighting or cross lighting produce different results even when the subject does not change.
Hard lighting, which is direct, non-diffused lighting, creates a different look than soft lighting achieves with the use of diffusion equipment including softboxes or an umbrella. Warm light with a lower Kelvin measurement creates a softer, warmer look than cool light, which delivers a more clinical appearance.
Of course, from a technical perspective, lighting affects the exposure of the image, white balance and settings like the right shutter speed for each shot.
What are Types of Photography Lighting by Source?
The two types of lighting in photography are natural light and artificial light.
Natural light is light provided by the sun, or in very low-light conditions, the moon or starlight. It is less predictable than artificial lights, so it is harder to control, but it is free and produces a more natural look to your photos.
Artificial light is lighting from a human-made source. It can be more precisely controlled than natural lighting. But it is costly in terms of the equipment and the energy used to provide power to lights.
Both photography lighting types have pros and cons, and photographers should be thoroughly familiar with both in order to achieve consistently good photos indoors and outdoors. And natural and artificial lighting can vary greatly. For example, natural light changes constantly. It varies throughout the day and throughout the year. It changes whether it is full sun or full shade, and based on the degree of shade, or a variety of partly sunny or partly cloudy conditions.
Artificial lighting varies based on the type of lighting used, the number of lights and their power, how lights are positioned and whether lighting reflectors or diffusers are used.
Natural Light
Natural light is ambient light from a natural source – light from the sun, moon or stars.

The advantages of natural light in photography are that it is available much of the day and costs nothing to use. Natural light provides hard light when it is direct and soft, diffused light in cloudy conditions and during the popular golden hour of photography, the periods of time just after sunrise and before sunset.
Additionally, natural ambient lighting gives your pictures a natural and realistic look. This is ideal for many types of daytime photography including landscapes, portrait, street, sports and wildlife photography. The dynamic range of natural lighting is excellent, allowing you to capture rich detail of subjects in or out of shadows.
Disadvantages of natural lighting start with the difficulty in controlling it. Natural light can change quickly, and the photographer may have to change camera settings quickly or lose good shots. The direction, brightness or color temperature are also hard to control, which can result in issues with exposure and shadow.
Artificial Light
Artificial lighting is light from a non-natural light source such as studio lights, LED panels, tungsten or fluorescent lighting. As a result, it is also called human-made light, man made light and electric light.

Artificial light can be controlled in every respect including the source, intensity, direction, color temperature and time. When mastered by the photographer, artificial lights give you precise creative and technical control over the conditions, so you can produce the images that fit your vision for the shoot.
Additionally, artificial light is consistent. When a photographer has a variety of artificial lighting options, results are predictable. And the flexibility of artificial lighting gives you creative control not provided by natural light.
The disadvantages of artificial light begin with cost. Good-quality lighting is expensive – not just for a variety of commonly used lights but for stands, reflectors, diffusers and electrical accessories. Secondly, mastering artificial lighting principles and practices can be difficult, and the resulting images can appear unnatural.
What Are Types of Light Diffusion?
In photography, light diffusion is discussed in terms of soft light and hard light. Hard light is light that is not diffused and is also called direct light. Soft light is diffused light, meaning that it is filtered, for example, like light through a lampshade.
Considering soft light vs hard light in photography, hard light creates sharp contrasts in the form of brighter color highlights and deeper shadows. Hard, direct light can also wash out the subject and produce overexposure. In contrast to direct, hard light, soft light is scattered. The result is a softening of all aspects of the image including color contrast and shadow.
Soft light diffusion can be used when shooting indoors or outdoors. When taking photos outside in natural light, cloud cover at any time of the day produces light diffusion by softening direct sunlight. Light during the golden hour just after sunrise and just before sunset is also considered soft light. The diffusion is caused by the greater amount of atmosphere the light travels through.
Indoors, diffusion is achieved mechanically. The most common equipment used to achieve soft, diffuse light includes:
- Softboxes: Using a fabric surface or front between the light source and the subject, a softbox spreads out the light for lighting that is less intense and harsh.
- Reflectors: Available in many colors including white, gold, silver and also translucent options, reflectors bounce light towards the subject, reducing intensity and producing softer lighting.
- Photography umbrellas: Your options are a shoot-through umbrella that light passes through and is diffused and a reflective umbrella that spreads out light by reflecting it off a curved surface.
- Diffusion panels: These translucent panels diffuse light passing through from the source to the subject, softening the light.
- Diffusion gels: These are sheets of translucent, sometimes colored, material used to cover lighting to reduce harshness.
Less common light diffusion products are frame and fabric scrims, opaque material directly between the light and subject, frosted bulbs that don’t require other softening means, diffusing light tents similar to softboxes and barn doors, which are adjustable flaps with diffusion material attached. For photographers with a tight budget, a sheet or sheer curtain can be used between the light source and the subject to produce soft light.
Soft Light
Soft light is light that is filtered, diffused or reflected. Fabric and translucent material are used to filter light. Reflective materials in reflectors and umbrellas are used to spread light out and make it softer, less harsh and intense.

Outdoors, soft light can be achieved with cloud cover, rain or mist, shooting within an hour of sunrise or sunset or the use of mechanical equipment to soften direct sunlight.
The advantages of soft light include gentler lighting with colors and shadows that show less contrast and harshness. It reduces the appearance of imperfections, for example, in the subject’s skin. And soft lighting produces a more natural look. It is gentler light and is more complimentary to the subject.
Soft lighting is used in many types of photography, especially portrait photography, fashion photography, boudoir photography, wedding photography, product photography, beauty photography, street photography and other still-life photography genres. In landscape photography, soft lighting is available during the golden hours of the day.
Hard Light
Hard light is light that travels directly from the source to the subject without diffusion. In fact, it might be concentrated light used for some photo shoots.
Common sources of hard light are direct sunlight and artificial lighting including spotlights, flash, and metallic reflectors that are curved to concentrate light.
The advantages of hard like include excellent brightness with crisp contrast between colors and deep shadows. Hard lighting is ideal for showing fine surface detail and texture.
Hard light is used in product photography, fashion photography, architectural photography, macro photography and other genres of photography when crisp detail and high contrast is desired.
What are Types of Lighting by Color Temperature?
The types of lighting by color temperature are warm light, neutral light and cool light. These are useful classifications, though color temperature is a spectrum with no clear delineations.
Color temperature in photography is the measurement of how warm or cool the light source is measured in Kelvins (K).
Warm Kelvin numbers range from about 1,000 to 3,000 or 3,500K. There is no hard and fast rule on exactly where warm light turns to neutral light. The color temperature spectrum of warm lights includes reds and oranges with some yellow and warm white.
Neutral light or neutral color temperature start at 3,000K or 3,500K and range to 5,500K, the color temperature of midday sun, which is considered the most neutral light. Other natural light sources in the neutral color spectrum are late morning and early afternoon, and bright moonlight. Artificial sources of neutral light are halogen, soft white LED, fluorescent or TL, cool white LED and some camera flashlight. The appearance of neutral light includes warm white, off-white, neutral white and some cool white.
Cool lighting is light higher on the Kelvin color temperature spectrum than about 5,500K, though some consider the “cool” spectrum to start closer to 6,500. It’s an arbitrary rating. Colors in the spectrum are neutral white, bluish white and blue.
Warm Light
Warm light ranges up to about 3,000K to 3,500K in terms of color temperature. It is used to give your photos a warm, intimate vibe.

Natural light sources of warm light include candlelight and fire in general, sunrise and sunset. Artificial lighting such as tungsten and incandescent lights, streetlights and warm LED lights also produce warm light.
In portrait photography, warm light creates complimentary images with rich, enhanced skin tones. Warm light is also used in boudoir and beauty photography to create a sensual atmosphere and in product photography when the goal is for the images to exude warmth and comfort. Warm lights create a cozy, intimate feel to evening photos, family pictures and those taken in warm-light hours in romantic settings.
Outdoors, landscape photography takes advantage of warm light during the golden hours of the day. Street photography makes use of warm streetlights.
Cool Light
Cool light in photography is considered light with a Kelvin rating of higher than 5,500K.
In natural light, light sources of cool lighting include midday sunshine, thin clouds to cloudy or overcast daylight, shade on a bright day and clear blue sky during the middle of the day, which can be 10,000K or higher.
Artificial lighting in the cool color temperature range is achieved with a bright camera flash and daylight LED lights and full spectrum LED lights with Kelvin measurements up to 6,500K. Specialty lighting such as HMI lights and strobe lights are also cool light types.

Cool light is good for outdoor photography including landscape, wildlife, sports and portrait photography. Indoors, cool light is used in product photography, portrait photography and some fashion photography when a cooler ambience is desired. It gives a truer color representation than warm light.
What Are the Types of Continuous Lighting?
Continuous lighting types are lights that stay on rather than flashing like a flash or strobe light. They give you the chance to see what the lighting effect will be before taking the shot, in contrast to a strobe or flash.
Here are the top types of continuous lighting and their advantages.
- LED Lighting: LED panels and spotlights are efficient and run cooler than other and older lighting types. You have a spectrum of color temperature options for LED lighting. It starts with warm light LEDs at around 2,500K. Soft white LED lighting has a color temperature of 3,500-4,200K; cool white LED is 4,000-5,500K, daylight LED lighting is 5,000-6,500K and full spectrum LED color temperature is 4,000-6,000K. Ranging from warm to cool and from warm orange to cool blue, LED lights are used in a wide range of studio photography genres including portrait, product, fashion, and black & white.
- Tungsten incandescent lights: With a color temperature of 2,500 to 3,200, this lighting delivers a warm yellow or warm white charm that produces a cozy, comfortable setting. It is ideal for portrait photography, fashion photography, black & white photography when a classic tone is desired, boudoir photography, and street photography or travel photography at night.

- Fluorescent lights: These off-white to neutral white lights range from 4,000 to 5,000K. Fluorescent lighting is used in studio photography for product and object photography mainly, though it is used in portrait photography, food photography, macro photography, for closeups and when a clinical appearance is desired as in scientific photography.

- Quartz lights aka quartz-halogen and tungsten-halogen lights: These are traditional continuous lights with a color temperature of about 3,200K. They produce a warm, slightly yellow appearance not unlike incandescent lighting. Quartz lights are used for portraits, fashion photography, boudoir photography and product photography among other genres.
- HMI (Hydrargyrum Medium-arc Iodide) and Plasma lights: These high-end continuous lighting options have a longer throw – they reach further – than other studio lighting types. They have a color temperature from 5,500 to 6,500 Kelvins. Both types mimic natural daylight. Hues are white to slightly cool blue.
Continuous lights are sometimes called hot lights, though there are cool light and warm light options.
What Are the Types of Strobe Lighting?
The most common types of strobe lights are monolights, speed lights, pack and head systems, and battery-powered portable strobe lights.
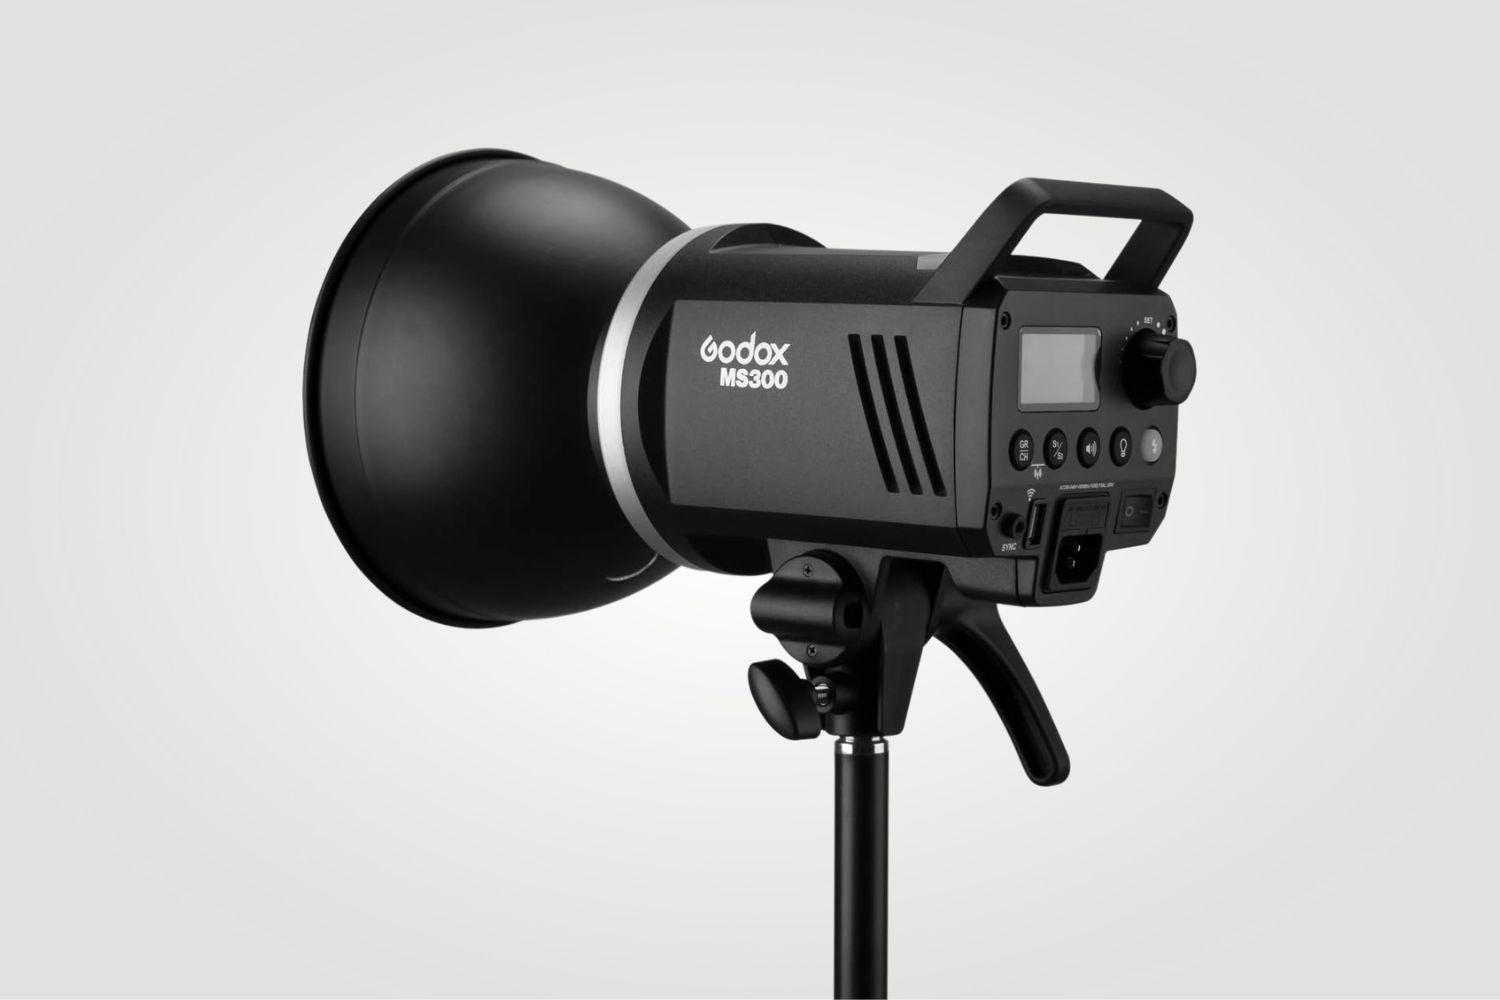
- Monolights: These self-contained strobe lighting systems include a built-in power system and a flash head that emits a very bright burst of light. With a color temperature of about 5,500, the same as noonday sunlight, monolights are ideal for studio photography genres including portrait photography, product photography, fashion photography and other still-life photography types.

- Studio strobe lights: These strobes are a staple in professional photography studios. They pack a lot of AC power with high output. Settings can be adjusted for each shot, if desired. They are a good choice for pairing with light diffusion equipment like softboxes and umbrellas. Studio strobes are used in all studio photography, especially portrait photography, product photography, other still photography and even shoots with moving subjects.

- Speedlights: These strobe lights are also called hot shoe flashes. They are compact strobes that attach to the hot shoe of the camera. Speedlight strobes are powered by batteries, which makes them lightweight and highly portable. While suitable for the studio, hot flash shoes are ideal for event photography and other on-location shooting.

- Pack & head strobe systems: These high-end, pricey systems are configured with one or more flash heads with a separate power pack. Pack and head strobes cycle quickly and produce high-power flash with good throw. This allows you to control multiple flash heads separately. This type of strobe is ideal for all types of studio work including capturing moving subjects.
- Ring flashes: These circular strobe lights fit around the camera lens for dynamic, bright shots with zero shadow. Photographers prefer ring flashes for fashion photography, close up portraits, and macro photography. Ring flashes are known to produce interesting light reflections in the eyes of subjects.

These are the most popular strobe lights because of their functionality. However, many pros also employ one or more additional strobes like bare-bulb flash strobes, continuous lighting strobes, and HSS strobes or high-speed sync strobes.

What Are the Types of Portable Lighting?
The most popular types of portable lighting are speedlights, LED panels, ring lights, portable light wands, and battery-powered strobe lights.
- Speedlights: They are also called hot shoe flashes because they can be attached to the camera’s hot shoe, the powered fitting on top of the camera where a flash fits. Or you can use them off-camera with a wireless trigger. Additional advantages of speedlights are their light and compact design. These portable photography lights support TTL metering (through the lens) plus manual metering. Speedlight portable lights are a good choice for portrait photography, event photography, street photography, outdoor shots when more light is wanted and other on-location photography.
- LED panels: Flat LED panels are built in a range of sizes and shapes, giving continuous lighting for studio and outdoor shots. Many are powered by rechargeable batteries, can be dimmed and have adjustable color temperature. LED panels are ideal for portrait photography, macro photography, product photography, black and white photography, and most studio photography types.
- Ring lights: These portable camera lights fit around the lens and can provide TTL or through the lens light metering. Providing even, continuous light, ring lights are best used in closeup portraits, product photography and macro photography.

- Portable light wands: Handheld light wands make it easy to put the light exactly where you want it, and they’re ideal when working in tight spaces. However, you often need an assistant for that job. Most are powered by rechargeable batteries. Portable light wands are commonly used in macro photography, creative photography including non-typical portrait photography.

- Battery-powered strobe lights: Nearly full-sized and powered by batteries, these give the photographer outstanding power output that is nearly the same as 120V studio strobes. The light is continuous and bright, though this can quickly drain battery power. They’re fairly lightweight, and battery powered lighting is compatible with softboxes, reflectors, umbrellas and other light diffusion equipment. These battery powered strobe lighting are employed in outdoor portrait photography, location shots in fashion and travel photography, and other on-location photography.

What Are Types of Lighting by Direction or In Relation to the Subject?
Lighting is placed in various positions around the subject to achieve the lighting effect desired for each shot.
The common types of lighting by direction include placing lights in front, in back, at the side, at a 45-degree angle, above, below, and broad lighting in which the side of the face toward the camera receives the directed light.
Where lighting is placed in relation to the subject impacts has several effects. It highlights or minimizes specific features of the subject by placing them in light or shadow. Light direction also sets the mood for the shot such as creating tension or something edgy, softening the subject for a romantic or cozy appearance, or producing a surreal, other-worldly vibe. Photographers are creative with light placement, usually trying various light directions in order to produce the right visual and tell the story in a unique way.

Front Lighting
Front lighting in photography is lighting placed directly behind the camera, so that it lights up whatever part of the subject is facing the lens. Ring lights around the lens produce good front lighting too.
The result of front lighting is even lighting with little shadow that produces a flat visual. This lighting technique may hide some imperfections in the skin. Front illumination delivers an even, balanced exposure.
Front lighting is a very common approach in portrait photography, product portrait photography, macro photography and most other genres shot in a studio. Good lighting options for front lighting include natural light and continuous lighting such as LED panels, speedlights, strobe lights, and ring lights.
Back Lighting or Backlighting
Back lighting in photography is lighting placed directly behind the subject and facing the camera. Another way of saying it is that the subject is backlit. Backlighting is a technology.
The results of back lighting, or back lighting, can be dramatic. It produces rim lighting with a light halo around the edges of the subject, which makes it stand out from the background. Another effect is silhouetting in which the subject can be underexposed relative to the backlighting, creating an ethereal effect highlighting shape rather than features, with lens flares or light streaks around the subject. Back lighting is a technique also used to create translucency in thin objects, highlighting the light passing through them.
Common lighting equipment for backlighting include LED panels, light wands, speedlights, studio strobes, reflectors and diffusers. Natural light from the sun is also an excellent source of back lighting.
Side Lighting
When using side lighting, lights are placed approximately 90 degrees to the side of the subject in relation to the camera. Side lighting photography emphasizes the contrast between highlights and shadows, creating greater depth to the image
Side lighting in photography brings out details along the side and edge of the subject and produces a more three-dimensional shot. The effect can feel moody or creative depending on how side lighting is used and whether it is softened with a softbox or filled in with a reflector.
Common lights for side lighting are natural light, speedlights, LED panels and portable light wands. Side lighting is used in product photography, architectural photography and portrait photography.
Semi-lateral Lighting
Semi-lateral lighting is lighting placed at the halfway point between front lighting and side lighting or about 45 degrees to the subject.
The advantage of semi-lateral lighting is that it provides both good lighting on the person or item’s features while adding depth to the image – a balance between light and shadow for a more three-dimensional effect. Reflections in the eyes of humans and pets is common with this photography lighting type.
Semi-lateral lighting is used in portrait photography, product photography, fashion photography and other forms of still photography. The best light types are LED panels, hot shoe flashes (speedlights), and strobes. The light is often diffused with softboxes, umbrellas to soften it and reduce glare. A reflector opposite to the light provides fill light.
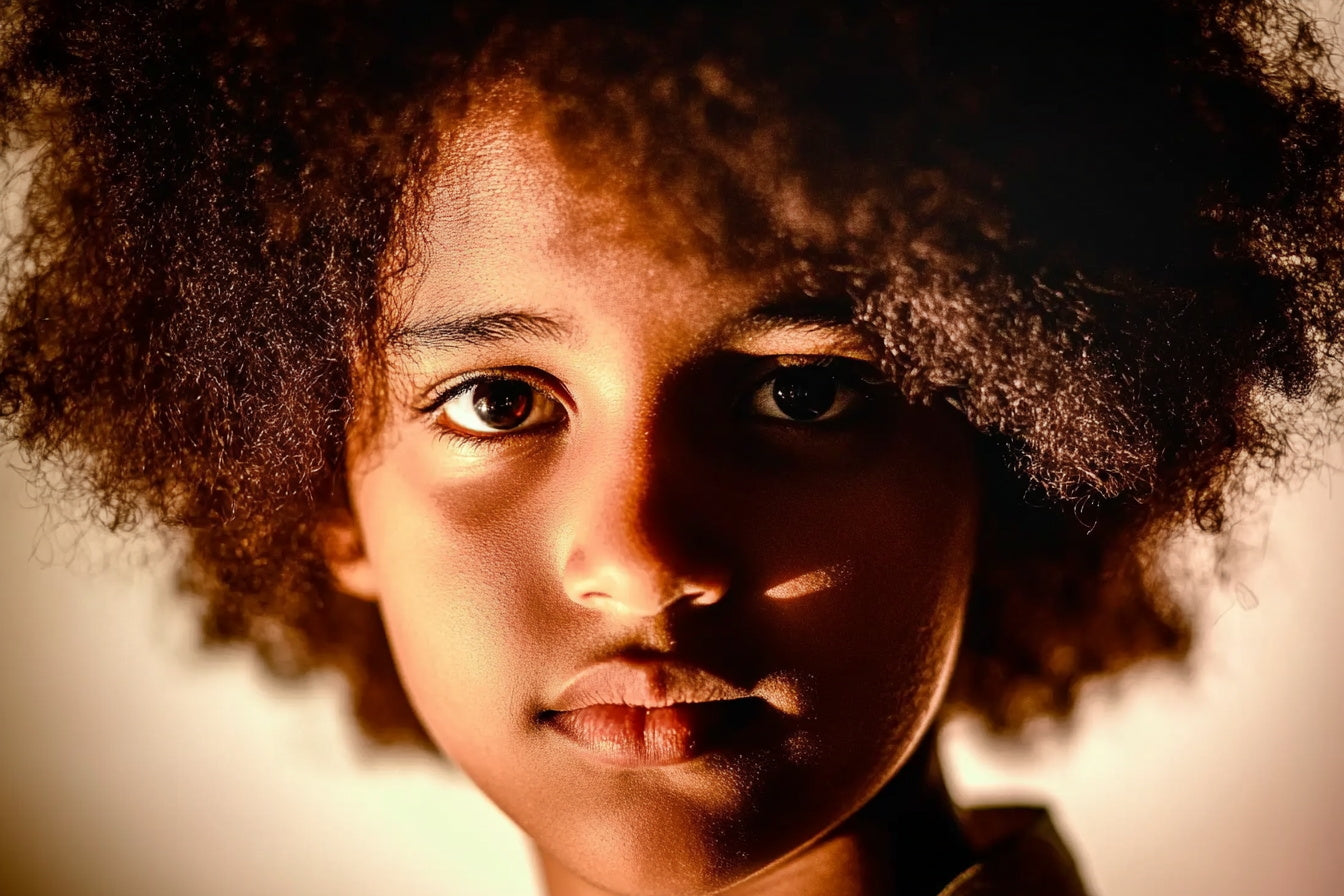
45-degree Lighting
45-degree lighting is similar to semi-lateral lighting but a little more complex. The lighting source is placed 45 degrees from the front to the side or from the side to the back. Also, the lighting is positioned 45 degrees vertically, usually above the subject.
45 degree lighting is also called Rembrandt lighting in portrait photography, an effect that lights the subject’s cheek opposite to the light source, typically with a small triangle of light. This photography lighting type provides more depth than front lighting, giving a more 3D look.
45-degree lights are used in portrait photography, beauty photography, and fashion photography especially to highlight the subject’s face. Natural light can be used for this purpose in addition to common studio photography (panels, strobes, speedlights), and diffusion equipment and reflectors help soften the light and provide fill light.
Top Lighting
Top lighting in photography employs lights directly above the subject. Mostly used in creative portrait photography to produce a flat image, top lighting delivers a dramatic, film noir-type image with facial shadows and an emphasis on certain features or textures of the subject.
Top lights are also used in product and food photography to enhance detail and texture, setting the subject apart from its surroundings in a sea of light.
Overhead sunlight can be used in the top lighting technique, and in the studio, ceiling panels and LEDs, ring lights, or strobes on a boom can be positioned overhead. Diffusion equipment and reflectors are also used with top lighting.
Bottom Lighting
Bottom lighting features lights placed directly beneath the subject, directed upwards. It is another specialty technique employed for creative purposes. The effect is intended to feel strange or dystopian with parts of the face such as the chin, nose and ears highlighted in atypical ways, often with deep shadows above.
Small LED panels, spotlights, speedlights and studio strobes are the best bottom lighting choices. The light can be softened to reduce the harshness of the image.
Broad Lighting
Broad lighting is lighting that highlights the side of the subject’s face that is towards the camera. It is a type of 45-degree lighting used when the person isn’t directly facing the camera. The effect is that the side of the face seems broader, which is a technique often employed when the subject has an angular or narrow face.
Mostly used in portrait photography, broad lighting produces softer shadows than front lighting and side lighting.
Broad lighting is produced using studio strobes, LED panels, and light wands. And the light is usually modified with a softbox, umbrella or reflector. Natural light is also useful for broad lighting.
What Are Types of Lighting by Function or Purpose?
In photography, lights serve unique functions or purposes when setting up a shoot. How the light functions affects the detail, light/shadow contrast, depth and mood of the images produced. Various lighting equipment can be used for these purposes – function is more about how the light is used rather than what specific light type it is such as an LED panel, studio strobe, speedlight or ring light.
A key light is the main light used, so it has the primary impact on the shot. Fill lighting is one or more additional lights that balance highlights and shadows to soften the contrast. A hair light focuses on the hair for brightness and detail.
A back light or backlight produces isolation or separation of the subject from the background, while a background ground lights up what’s behind the subject. An accent light is used to draw attention to a feature or detail the photographer wants the camera to pick up.
A catch light or catchlight is shined so that the eyes of the subject reflect it. A bounce light is a light bounced off a reflector or reflective surface and onto the subject, diffusing it so that the light is softer than direct light. Kicker lights are rim lighting used for definition of details. And practical light adds a realistic ambience to the scene.

Key Light
The key light is the primary or brightest source of light in a photo shoot. The key light’s purpose is to give definition and contour to the subject, create shadow and generally set the mood.
The most common key light placement is as 45-degree lighting, but this main light can also be front light, back light, semi-lateral lighting, etc.
Every type of photography uses a key light including studio photography such as portrait photography, beauty and boudoir photography, product photography and other still life photography genres.
Fill Light
A fill light or lights are secondary lighting sources used for the purpose of filling areas of shadow caused by the key light. The result is a softer contrast between highlights and shadow rather than eliminating shadow entirely.
Fill lights are less intense than the key light and are placed opposite to the key light. They may also be used to fill other potential areas of shadow to the sides of the subject.
In portrait photography, these lights function to produce lighting balance which delivers an even exposure.
Back Light
A back light or backlight is a light source placed behind the subject and directed toward the camera with the subject in between.
The purpose of a back light is to separate the subject from the background with the use of light flooding around its edges. Backlights are often slightly raised and angled downward.
A back light is used to show the details of the subject’s shape in portrait photography, product photography, black & white photography, and fashion photography.
Hair Light
A hair light is a type of backlight that is placed behind and slightly above the subject’s head and is directed down at their hair.
The purpose of a hair light is to give dimension and depth to the hair as well as to show the hair’s detail or details of items placed in the hair.
Photographers commonly use hair lights in portrait photography, fashion photography, beauty photography and, of course, when the subject’s hair is the main attraction of the shot.
Background Light
A background light shines onto the background to light it up and reduce or eliminate shadows behind the main subject.
Additionally, the purpose of background lighting is to add depth to the image and show what is behind the subject.
Background lighting is placed above or to the sides of the camera and directed onto the scene behind the subject. This lighting technique is mostly used in studio shoots for portrait photography, pet photography, and product photography but is employed creatively in other genres too.
Accent Light
An accent light is a light directed onto a specific area, feature or detail of the subject.
The purpose of an accent light is to draw the viewer’s eye to important details in the image by highlighting them, thus creating visual interest and appeal.
Common subjects of accent lights are hands, lips, eyes, cheekbones or legs in portraiture, fashion or boudoir photography, or a product’s details or logo in product photography such as automotive photography.
Catch Light
A catch light is a light shined toward the subject, so that their eyes catch and reflect the light back to the camera lens.
The purpose of a catch light or catchlight is to put a twinkle or sparkle in the eyes of the person or pet. A single small light is placed in front of or at a slight angle to the subject.
In some shoots, the key light, if properly placed, functions as a catch light. You’ll see the reflection of a catch light mostly in closeup portrait photography. Ring lights are very commonly used as catchlights.
Bounce Light
A bounce light is light that is reflected off of a surface, often a reflector, wall or diffuser, and onto the subject.

The purpose of bouncing light is to diffuse and soften it, so that the contrast between highlights and shadows is reduced.
The light from a bounce light is more flattering to the subject in portrait photography, beauty photography, and boudoir photography. And bounced light creates a gentler image in fashion photography and product photography.
What Are Lighting Techniques for Portrait Photography?
Lighting techniques are techniques using combinations of lighting and placement to produce a specific effect in the image. Various light types are used in lighting techniques for portrait photography.
The best-known portrait photography lighting technique is Rembrandt lighting in which light placement produces a triangle of light on the opposite side of the face from the side that is highlighted.
Loop lighting is similar to Rembrandt lighting but produces a look that is softer, less chiseled. Broad lighting highlights the side of the face toward the light and the camera, making the face look wider, less angular.
Short lighting brightens the side of the face that is not towards the camera. The result is a narrower, more angular face. Butterfly lighting is a light placed over the subject’s head, shining downwards to produce a butterfly shadow beneath the person’s nose.
Split lighting is set up so that half the face is illuminated and half is in shadow, producing an air of mystery and evoking a desire to see the rest of the face. Clamshell lighting is the combination of a main light and one or more fill lights to reduce harsh shadow and contrast. The result is lighting that is soft and complimentary.
Backlighting is a lighting technique in which the light is placed behind the subject, facing the camera, so that the subject is between the light and the camera. Backlighting produces a strong contrast between the subject and the background, resulting in light at the edges, and when the backlight is bright, a silhouette.
Cross lighting is a photography lighting technique that places two lights on opposite sides of the subject, typically at a 90 degree angle. The resulting image contains both very bright highlights and deep shadows.
Rembrandt Lighting
Rembrandt lighting, named after a portrait lighting technique employed by the Dutch painter, is a type of 45 degree lighting. It is achieved using a key light placed 45 degrees to the side of the subject and just above eye level.
The key light fully lights one side of the face but also reaches across the face. The head of the subject is turned slightly away from the light source until a small triangle of light forms on the opposite cheek. The triangle is formed as light is blocked by the nose and brow of the subject. A fill light can be used to soften the shadows and contrast.

The result of Rembrandt lighting is a classic look with depth and dramatic flair in the portrait.
Loop Lighting
Loop lighting is portrait lighting that directs light toward the subject’s nose to produce a light shadow loop onto their cheek.
In the loop lighting technique, a key light is placed at from 30 degrees to 45 degrees to the side of the face and just above the eye. The light shines slightly downward to produce the shadow.

Place the subject so that their face is toward the camera but at a slight angle towards the light. Make minor adjustments to placement until the shadow appears on the side of the nose and cheek opposite the light. As with Rembrandt lighting, fill light can be used to soften the contrast.
Broad Lighting
Broad lighting is a portrait lighting technique often used with subjects that have a narrow or angular face. The purpose is to produce a broader appearance.
In broad lighting, the subject turns a preferred side slightly away from the camera, 30-45 degrees, with a front key light illuminating that side. As with other portrait photography lighting techniques, the light should be above eye level and angled downwards.

This positioning of the head allows for a soft shadow to fall on the opposite side of the face. Fill lighting is an option with broad lighting when reducing the contrast is desired.
Short Lighting
Short lighting is the opposite of broad lighting in that the key light illuminates the side of the face turned 30-45 degrees away from the camera, called the short side of the face. A key light is placed to shine on that side of the face, slightly above eye level and pointing toward the face and down.

While broad lighting makes the face seem wider, short lighting makes the face seem narrower, more angular. The result is an image with more depth and visual interest. As in most portrait photography lighting setups, fill lights can be used for a softened image.
Butterfly Lighting
Butterfly lighting is another portrait photography lighting technique that uses shadow on the face of the subject to create visual interest. In this case, light is shined from slightly in front and above the subject to use their nose to create a butterfly-shaped shadow beneath their nose. Fill and background lighting is optional.

To achieve butterfly lighting, place your key light directly in front and above the person, so that light shines downwards at between 30 and 45 degrees. Adjust the light position and angle until the characteristic butterfly shadow appears.
For best results, the subject might need to tilt their head up slightly for their nose to cast the shadow. If the person has strong cheekbones, they’ll cast a shadow too.
Split Lighting
This portrait photography lighting technique is achieved by illuminating one half of the subject’s face and leaving the other in shadow, creating a distinct vertical contrast between right and left sides. Using fill light will make the contrast less dramatic, if desired, and background lighting will separate the subject from the background.

For split lighting, place a key light at head level, centered slightly above eye level, directly to one side of the subject – at a 90 degree angle to the person relative to the camera.
For best results, the subject should look straight ahead.
Clamshell Lighting
Clamshell lighting in portrait photography is a technique employing both a key light and fill light to produce a soft, flattering image. Shadows are minimized while the subject’s features are highlighted, bathed in a glow of light.

To achieve clamshell lighting, a main light is positioned in front of the person, just above eye level, pointed slightly down. Light diffusion is often used, such as a softbox or umbrella to soften the light. The purpose is to brighten the upper face. Then a fill light or reflector is placed in front and slightly below chin level – the top key light and lower light source form the “clamshell.” When the subject looks straight ahead without head tilt, the lighting illuminates the entire face.
Backlighting
The backlighting technique in portrait photography employs a key light behind the subject, pointed toward the camera. Light flows around the subject to produce separation and contrast between the subject and the background. A rim or halo of light is produced, and when the key light is very bright, the result is a silhouette. The effect can be softened by fill lighting in front or to both sides at a 45 degree angle.

The key light in back can be elevated or lowered, or moved closer or further from the subject to produce different effects. In any case, the rear light equipment in backlighting should not be visible to the camera.
Cross Lighting
Cross lighting requires two light sources directed at the subject from opposite sides, at roughly 90 degrees apart rather than 180 degrees apart. The result of cross lighting in portrait photography is a dramatic conjunction of light and shadow with strong 3D dynamic.

Lights are placed 45 degrees away from directly in front of the subject. Each light illuminates a different side of the face or body.
The cross lighting lights can be of equal intensity for balance or different intensity to produce greater contrast and shadow. Setting the lights at different heights will also change the effect, and so photographers experiment creatively to produce unique and interesting images.
Why a Backdrop is Also Important for Portrait Photography In Addition to Lighting Equipment
Using one of your many backdrop options in portrait photography is important for setting the scene and providing context for the shoot. It creates the atmosphere for the photos. For example, a holiday backdrop produces a very different atmosphere than a wood plank barn wall or a flowering bush. And the use of backdrops gives every photography session an air of professionalism.