Boogschutter
What is White Balance in Photography: Ultimate Guide for Beginners
White balance in photography is the process of adjusting color in photos to make them accurate and appear natural regardless of the lighting conditions.
This guide explains white balance including key issues like color temperature and its impact on photos, the color temperature of common light sources, how to improve white balance and correct errors, an explanation of your camera’s white balance presets including custom white balance, artistic uses of white balance, and tips throughout for improving the color accuracy to give your photos the appearance you desire.
What is Color Temperature?
Color temperature in photography is the measurement of how warm or cool a light source is. And it impacts the color cast of the photos you take. Understanding how color temperature affects exposure allows photographers to manage color level and the color hues of their photos. This is true whether you want strong color integrity or wish to adjust white balance to enhance the mood you’re creating in the photo.
Color temperature is measured in Kelvins (K) and is a spectrum. Every light source such as artificial lighting, sunlight at various times of the day, and shade and cloudy skies has a different color temperature.
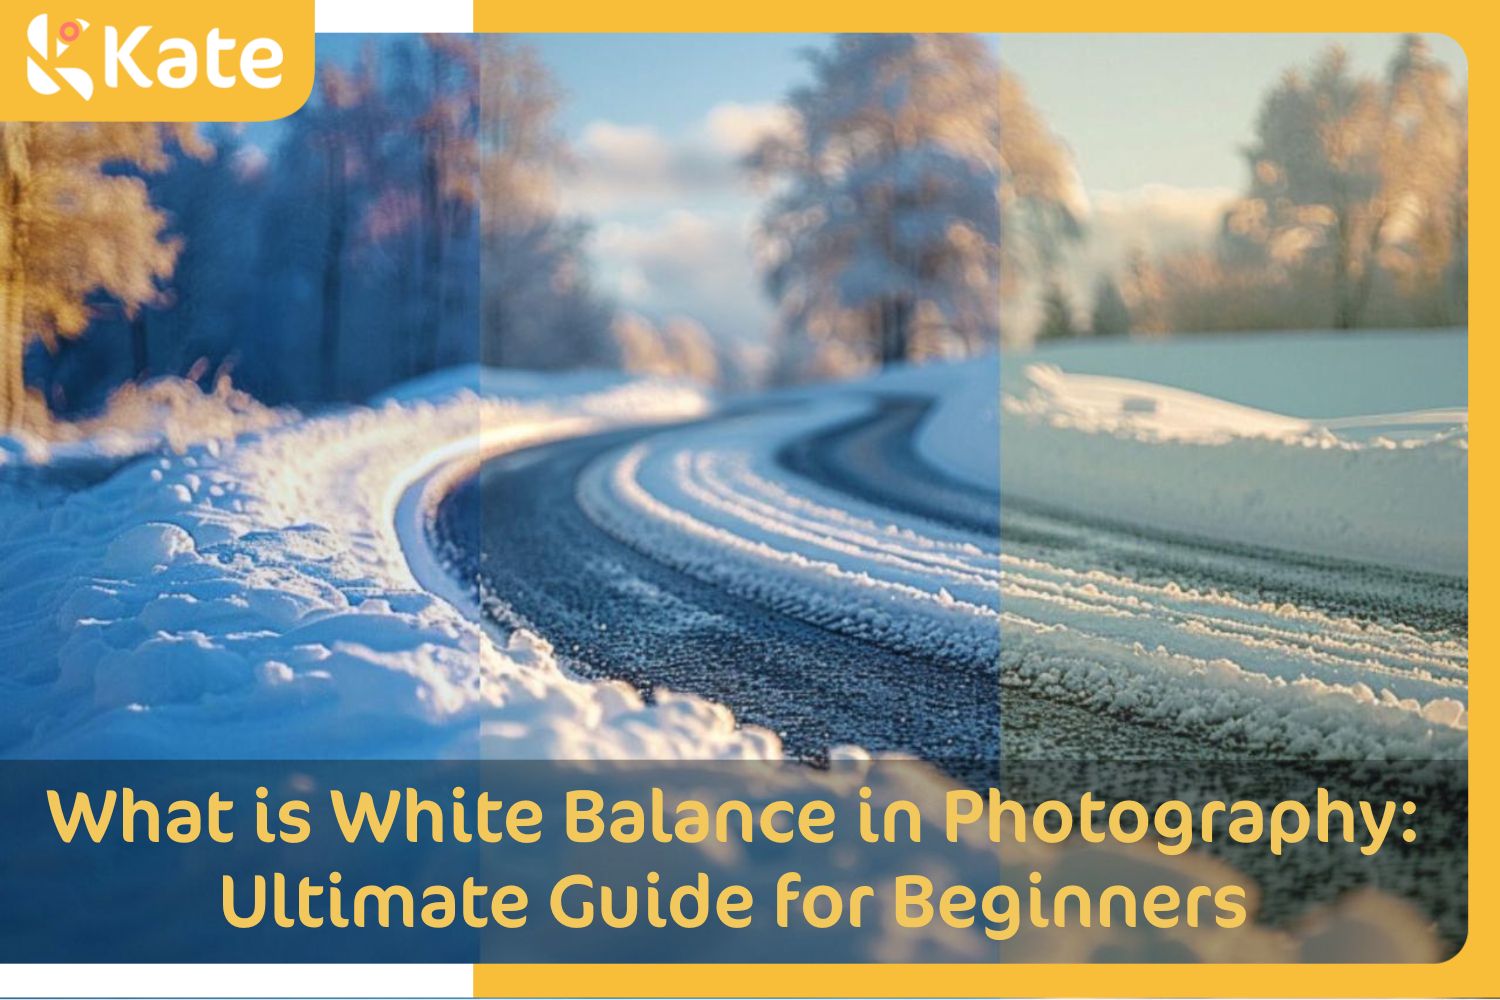
Low Kelvin numbers, for example from around 1,000 to 3,000 K, represent colors on the warmer end of the color temperature spectrum such as reds and oranges. Sources of warm color temperature include fire, sunset and some lighting.
Yellow and white are neutral, starting at about 3,000 Kelvin. Midday sun is about 5,500 Kelvin and considered the most neutral color temperature. Dawn and dusk, or the golden hour, some midday conditions and moonlight are among the sources of neutral light on the Kelvin spectrum.
Cool colors in photography include greenish blue and the blue range, and their K numbers are over 5,500 to 10,000. Lighting sources for cool color temperature include overcast skies, shady areas on a clear day, and deep blue skies.
Note that there is a seeming contradiction here, if you’re thinking about the color of a flame, for example. The hotter it gets, the more it changes color from warm yellow to orange to white to extremely hot blue. But in terms of color temperature, the color goes from very warm yellows and oranges to very cool blues.
The white balance setting on a camera allows the photographer to adjust color temperature in the image to enhance or improve color or to compensate for the lighting conditions when taking photos. Color temperature can also be changed in post-processing, especially when the photos are shot in RAW.

What Is the Color Temperature of Different Light Conditions?
|
Natural Light Conditions
|
Color Temperature (Kelvins)
|
Appearance
|
|
Sunrise and Sunset (Golden Hour)
|
2000 - 3000
|
Reddish Orange to Yellow
|
|
Moonlight
|
3500 - 4500
|
Warm White to Neutral White
|
|
Clear Early Morning and Late Afternoon
|
3500 - 4500
|
Warm White to Neutral White
|
|
Clear Late Morning and Early Afternoon
|
4000 - 5500
|
Warm White to Light Blue
|
|
Clear Noon / Midday
|
5000 - 6500
|
Neutral White to Light Blue
|
|
Cloudy and Overcast Daylight
|
6000 - 9000
|
Neutral White to Medium blue
|
|
Thin Clouds Midday
|
6500 - 8000
|
Cool White to Light Blue
|
|
Shade (Depending on sun or cloud coverage)
|
6000 - 8000
|
Medium Blue to Dark Blue
|
|
Clear Deep Blue Sky - Morning and Afternoon
|
6500 - 10000+
|
Cool White to Dark Blue
|
|
Artificial Light Conditions
|
Color Temperature (Kelvins)
|
Appearance
|
|
Candle Light
|
1000 - 2000
|
Warm Reddish Orange to Yellow
|
|
High-pressure Sodium (streetlights)
|
1700 - 2200
|
Warm Orange to Warm Yellow
|
|
Tungsten / Incandescent
|
2500 - 3200
|
Warm Yellow to Warm White
|
|
Warm White LED
|
2500 - 3500
|
Warm Yellow to Warm White
|
|
Halogen
|
3000 - 4000
|
Warm White
|
|
Soft White LED
|
3500 - 4200
|
Warm White
|
|
Fluorescent or TL
|
4000 - 5000
|
Off-white to Neutral White
|
|
Cool White LED
|
4000 - 5500
|
Cool White to Neutral White
|
|
Camera Flash
|
5000 - 6000
|
Neutral White
|
|
Daylight LED
|
5000 - 6500
|
Neutral White
|
|
Full Spectrum LED
|
4000 - 6000
|
Cool White to Light Cool Blue
|
What Affects the Color Temperature of a Photo?
The most significant factors affecting the color temperature of a photograph are the light source, the time of day/weather, your camera’s white balance settings, the subject and its immediate environment, and the use of white balance lens filters.
- Light Source (artificial): The light source is the most important factor affecting the color temperature of a photo. When using artificial light, the color temperature ranges from about 2,000 to 7,000 Kelvin. On the warm end or low end of the spectrum, streetlights are around 2,000 K, and tungsten lights (incandescent) average about 3,000 K. In the middle are warm LEDs with an average color temperature of 3,000 K and fluorescent lights at an average of 4,500 K. A camera flash ranges 5,000 to 6,000 K depending on the camera and setting. On the cool end, daylight LEDs can be as high as 6,500 Kelvin. Mixed light sources create considerable challenges for attaining proper white balance.
- Time of Day/Weather: Color temperature is warmest at sunrise and sunset and in the golden hour surrounding them, between 2,000 and 4,000 Kelvin. On clear days, tones are neutral to cool in midday, or between 3,500 and 6,000 K. And they are coolest on days with a deep blue sky when the color temperature ranges from around 6,500 to 10,000 or higher.·
- White Balance Setting: Your camera has white balance settings that adjust the sensor. You can select AWB or auto white balance, or from presets light tungsten (indoors) or Daylight (outdoors). And if your camera has it, you can use the custom white balance setting to set a custom white balance using a white card or gray card.
- Subject and Environment: Whether the subject and environment, such as a wall or backdrop, absorb or reflect or scatter light can change the color temperature of the shot. Photographers often use reflectors when they want to boost the color temperature of a photo. When the reflection or scattering of light isn’t intentional, it makes good white balance more difficult.
- Filters: Three kinds of lens filters will affect color temperature. Warming filters, cooling filters and color correction filters are available.

What Is White Balance?
White balance is the adjustment made by a camera to balance the color temperature in the image to ensure that the photos you take display true colors without unwanted color cast. In more technical language, white balance adjusts the colors to their true hue to compensate for any potential cast caused by the color temperature of the light source. The purpose is to ensure that colors are accurately represented.
Your camera’s white balance focuses primarily on neutral colors such as gray, white and black, because they are most susceptible to casts of an unnatural color, usually from lighting present in the environment. However, white balance will correct non-neutral colors but to a lesser degree.
For example, white balance will correct for the orange cast of street lights, so that a snow on a tree beneath the light appears white rather than tinted with orange.
In many environments, a dominant color will cast a hue onto the subjects/objects, so that they do not appear natural. When your camera senses a color being cast over the scene or onto the subjects, its white balance function will adjust the image to remove the right amount of the color to ensure the photo depicts the true colors present.

Why Is White Balance Important in Photography?
White balance is important because it ensures that colors in your photos are accurately rendered rather than being tinted by non-neutral color temperatures creating a color cast. In short, it gives your images color fidelity, so that they look natural.
Every environment, whether indoors or outdoors, features ambient light with one or more color temperatures that can cast unnatural light onto the subject or objects in the image. For example, images taken during holiday gatherings may be tinted with red or green casts. Unless the color cast is desired for artistic effect, you’ll want to remove the cast using white balance, which returns objects in the photo to their realistic colors.
The key benefits of white balance in photography are color accuracy and images that look natural. Keep in mind too that white balance adjustments can be made to use color casts to artistic advantage depending on the mood you wish to express. White balance gives you creative control over colors.
What Are the Differences between White Balance in a Camera and in Post Processing Software?
There are three key differences between white balance on your camera and adjusting white balance with post processing software: Timing, the level of control you have and the amount of information you have to work with.
First, if you rely on your camera for proper white balance, then the setting must be adjusted prior to taking the picture. If you’re planning to use software, then the white balance adjustments are made later. That’s obvious.
Secondly, and more importantly, is that you have limited control over white balance using your camera and far more control in improving and altering white balance when you use a white balance post processing software.
In terms of control, your camera has limited options such as auto white balance (AWB) or one of the camera’s presets. They vary from model to model, but most have tungsten, daylight, cloudy and a few others. Using photo editing software, you have a much wider range of controls, and more precise control, for adjusting white balance. These include a color temperature slider for precision, making specific adjustments within the image or using a dropper tool with a neutral point in the image to give the entire image the white balance tone you want.
In terms of the information you have to work with, if you rely on your camera’s white balance, then by definition you are not shooting RAW, and you’ll have less image data to use in post processing. This will limit the scope and degree of white balance changes you can make. On the other hand, if you shoot in RAW, then you will have all the image data to work with in perfecting white balance in the image or using it to give your shot the artistic color temperature affects you desire.

How to Change White Balance In a Camera
Change white balance in your camera using the settings. Each DSLR or mirrorless camera has a slightly different sequence, but all are similar to these steps.
- Power on the camera, and choose shooting mode, which might include rotating and extending the lens.
- Choose the menu (M) button on the top or back of the camera body.
- Use the directional arrows, or touchscreen if it has one, to navigate to the white balance settings.
- Make your white balance setting choice – Your options might include auto white balance (AWB), Daylight, Cloudy, Shade, Tungsten, Fluorescent, Flash and Custom/Manual.
- If you select custom, you’ll need to take a photo of a white card or gray card and set that photo as the reference for the white balance you want in your photos.
- Fine tune the white balance if your camera has this advanced option. This is useful if you know the color temperature of the lighting you are shooting with.
For point-and-shoot cameras and smartphones, white balance settings, if the device has them, are found in the camera settings (point-and-shoot) or the phone’s camera app.
What Are White Balance Presets In a Camera?
These are the most common white balance presets for mirrorless and DSLR cameras.
-
AWB or auto white balance – Best for color temperature 3,000 to 7,000 K. The camera will detect light conditions and choose the best white balance setting for the scene. If you’re unsure which preset to choose, experiment with AWB first as the default, and if the image shows color cast, try a preset or custom setting. Some Canon models offer two AWB choices. Ambience Priority is the default and delivers a photo that retains lighting warmth. White Priority seeks to remove any color cast and deliver pure whites.
-
Daylight or Sunny – Best for color temperature around 5,000 to 6,500. Ideal for shots using natural light on a clear day.
-
Shade – Ideal for cooler light around 6,500 to 8,500 Kelvin, the shade white balance preset is designed for moderate shade rather than deep shadows.
-
Cloudy – Best for overcast days in natural light with a color temperature of 5,800 to 6,700 K. Some photographers also use this setting to add a little warmth to indoor environments with cool lighting. And it can help offset the blue cast of LED and fluorescent lights.
-
Tungsten or incandescent – Tungsten lights have a color temperature of around 2,500 to 3,200. This preset is used around lighting, usually indoors or outdoors at night, that has a warm yellow cast, and it can also be best for shooting under streetlights with a warm yellow/orange glow.
-
Fluorescent – Ideal when the lighting source is fluorescent, or about 4,000 Kelvin, which is generally cool with a neutral or slightly green color.
-
Flash – Always use this setting first when shooting with a flash. The color temperature of your camera’s flash is around 6,000 K.
-
Custom – Called manual on some cameras, custom white balance is used when you want the white balance in your shot to use a reference photo of a white card or gray card to set the white balance.

What Are the Pros and Cons of Auto White Balance?
The benefits of auto white balance, AWB, are ease of use, it allows you to get a shot quickly, and most cameras do a good job of getting white balance right. Auto white balance works well in a range of lighting color temperatures.
Major cons or disadvantages of AWB are inaccuracies in white balance especially in mixed lighting conditions, loss of creative control, and that if there is no “true” white in the shot, the camera won’t have a white balance reference point, and you can expect color cast.
How to Change White Balance in Post Processing Software
Here are the basics for changing white balance in the most popular post processing software products – Adobe Photoshop, Adobe Lightroom and Adobe Camera Raw.
- Photoshop: Choose Image > Adjustments > Color Balance. A box with 3 sliders will open. The Yellow/Blue slider and the Cyan/Red slider are used to change the color temperature of the shot. The Curves slider is for choosing a white part of the shot as your white balance reference, choosing a black point, and then moving around the curve to adjust white balance.

Image from Adobe
- Lightroom: Find the Development Panel. Select the White Balance dropdown menu. You’ll see options for various lighting conditions. Make your choice to adjust the white balance of the shot. There’s also a Temperature slider for warmer/cooler color temperature adjustments, and a Tint slider to balance green. Lightroom also allows you to set a custom white balance using a neutral tone from a white or gray card, which you can then use to edit any image.

Image from Adobe
- Adobe Camera Raw (for RAW files): Within Photoshop, choose Camera Raw. Open the image and select the RAW file you want to edit. Select the white balance controls on the Basic panel, use the white balance dropdown menu, and choose the preset (Auto, Daylight, Shade, Tungsten, etc.). Make precise adjustments using the Temperature and Tint sliders. The White Balance Tool, a dropper, also allows you to select a neutral spot in the image with a white balance you like, and Camera Raw will automatically adjust the Temperature and Tint sliders to match.

Image from Adobe
The exact steps are slightly different in other photo editing software like Premier Pro, Affinity Photo and Picasa.
What Is the Green-Magenta Tint?
The gm tint is a color issue that occurs in many images taken in white light conditions. While color temperature is adjusted between yellow and blue, color tint or cast can only be adjusted between green and magenta, hence the name gm tint.
The color inaccuracies are caused by the light varying from true white, and the result is an image with a tint or cast. The most common causes of the gm tint are:
- Fluorescent lights – The most common deviation from pure white is a greenish tint.
- LEDs – Some LED lights cause either a light green or slight magenta tint.
- Mixed light sources – These are the most challenging situations often causing a color cast that is difficult to correct. Green or magenta tinting is common.
White balance settings that are incorrect are a source of gm tint. The cause is often choosing the wrong preset or failing to use a preset. AWB or auto white balance can also be confused by lighting, especially mixed sources, resulting in tinting.
A less common cause of the gm tint, but worth considering, is your camera’s sensor. Digital sensors may misinterpret light, which can result in an unnatural tint that must be corrected.

How to Adjust the Green-magenta Tint
The gm tint is adjusted or corrected in several ways. Try various white balance presets to clear it up. If that doesn't work, use a custom white balance or manual white balance with a white or gray card as a reference. This will correct the tint to neutral.
Your camera might also offer advanced fine tuning of white balance, which is useful if you know the exact color temperature of the lighting.
Finally, you can shoot in RAW and perfect the white balance to eliminate gm tint in post processing. Use a photo editing software like Photoshop or Lightroom. Find the white balance tools; a tint slider is included in most. Typically, slide to the left to correct a magenta tint by adding green. Or slide right for the opposite correction. If the software has an eyedropper icon (Lightroom, Adobe Camera Raw), use it to click on a neutral area without a tint, and it will correct the color balance within the entire image.
What Are Ways to Use White Balance Artistically?
You can use white balance artistically to add, enhance and alter the colors or mood of a shot. Here are common artistic uses of white balance in photography.
Add or exaggerate color cast: You may want to enhance and deepen a dominant color in the shot, like the warm yellow sunlight bathing a mountain side at dusk or the cool, steely blue of thunderclouds. When the scene is cool, such as a shady grove of trees, you can warm up the scene to bring out the natural greens of the scene for enhanced balance.- Heighten color contrast: This is a post-processing adjustment. It is a process of adjusting the balance of different parts of the image. This is done to enhance contrasts to produce more vivid color divergence. Or, for example, if you add warmth to the foreground of the picture while cooling the background, the subject in front will be isolated, a technique not unlike bokeh in depth of field.
- Match or create the mood: Color impacts the emotional language of a picture, for example, warm and nostalgic, cool and peaceful or cold and stark. An image of a couple embracing in cool light can be warmed to make the white balance match the mood. Consider a warmer white balance for a sunlit scene and a cooler white balance for a wintry-gray landscape. Try different white balance settings and adjustments to get the mood you want.
- Try Different Light Conditions: Experiment with different white balance presets to see what your subject looks like in different light conditions. If the goal is an image that is warm and inviting, a warmer white balance is a good choice. For a professional, no-nonsense look, choose a white balance that will produce a cooler look.
Does White Balance Affect Black and White Photography?
Yes, white balance does affect black and white photography, making the image warmer or cooler. But it impacts B&W photography to a lesser extent than it affects color photography.

Here is how white balance affects black and white photography:
It impacts tones and contrasts.
Before converting to black and white, enhancing or reducing colors in the image will impact how gray shades are rendered.
Also pre-conversion, the white balance preset you select will change the way the black and white picture looks. A common example is that shooting in the tungsten preset will produce darker cool tones in the converted image.